
Plan your Golf Vacation
800-576-1570
#4 Public Golf Course in U.S. and Ranked 25th amongst the 100 Greatest U.S. Golf Courses
—Golf Digest
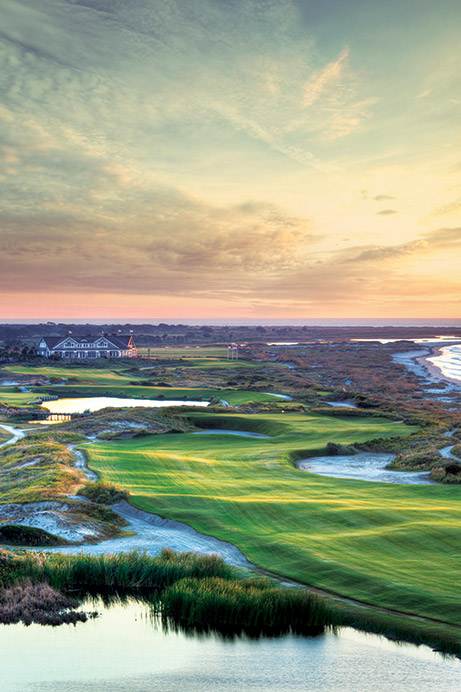
The Ocean Course: An American Icon
Join the ranks of avid golfers who have The Ocean Course at Kiawah Island Golf Resort on their must-play list for a true test of skill. Located on the eastern-most end of the island, The Ocean Course boasts the most seaside holes in the Northern Hemisphere with ten hugging the Atlantic and the other eight running parallel to those. Although it was originally planned to sit behind the dunes, designer Pete Dye’s wife, Alice, suggested raising the entire course to give players unobstructed views of Kiawah’s stunning coastline from every hole. One catch? This improved view made the course substantially more demanding as it also exposed play to the Atlantic’s brisk and unpredictable breezes.
In fact, it’s unlikely any other golf course in the world—outside the United Kingdom and Ireland—is affected as much by wind. From one round to the next, a player can experience up to an 8-club difference on holes depending upon the wind’s direction and strength. Interesting fact: Because there are no prevailing winds on The Ocean Course, Dye designed two courses in one—one for an easterly and the other for a westerly wind.
- Yardage:
395
Handicap: 15 - Yardage:
375
Handicap: 15 - Yardage:
365
Handicap: 15 - Yardage:
357
Handicap: 15 - Yardage:
306
Handicap: 9
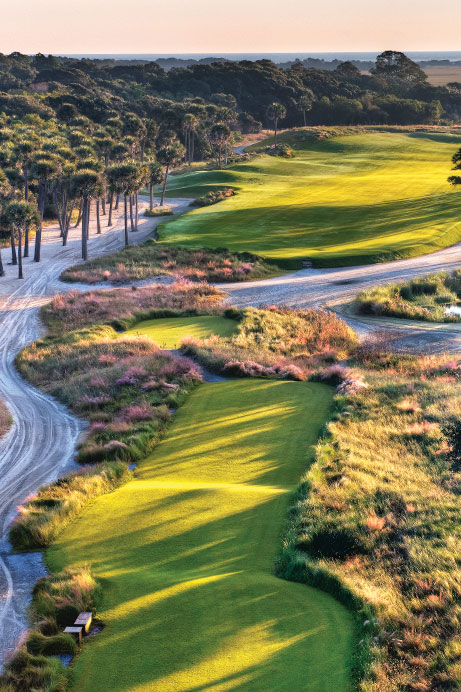
This hole presents one of the narrowest fairways on the course. Still, there is plenty of room between the natural sand area along the right side of the fairway and the thick dune grass bordering the left. A good drive will leave a short iron into a gently undulating green tucked into a natural dune area.
Pete Dye’s Comment: This hole is the furthest from the ocean. We did everything we could to make it as open as possible off the tee. There is a mammoth amount of room to hit your driver, so just hit it. The green is at ground level and everything on the left bounces into the green. It should be an easy starting hole.
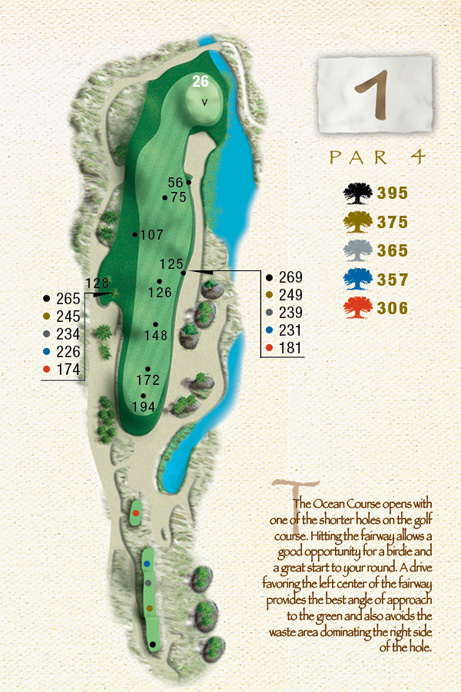
This is one of the easiest holes on the course. Feel free to use a driver off the tee but a 3-wood is plenty. There’s plenty of room to recover, especially from the waste bunker on the right. The left side of the fairway gives the best angle into the green. It’s a good hole to get a round started with a possible birdie.
- Yardage:
543
Handicap: 3 - Yardage:
528
Handicap: 3 - Yardage:
501
Handicap: 3 - Yardage:
495
Handicap: 3 - Yardage:
419
Handicap: 3
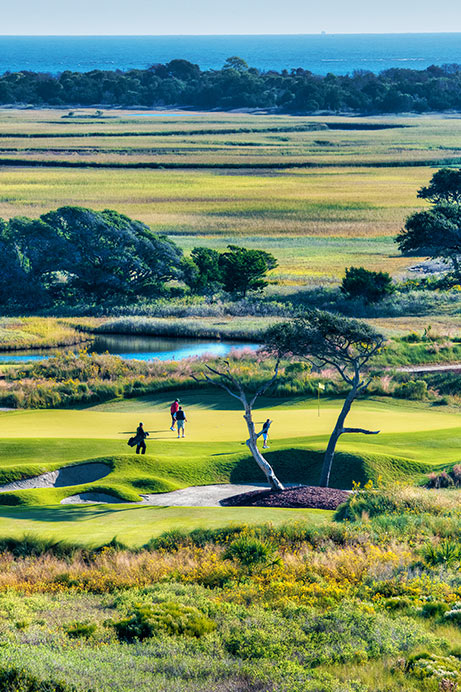
From the back tee, you’re as far from the Atlantic as The Ocean Course allows, yet the view from here looks right into the rolling surf, framed by ancient live oaks. Decide how much of the salt marsh to bite off with your tee shot. Then, depending on wind direction, you can go for the elevated green set between two sand ridges.
Pete Dye’s Comment: This is a difficult hole with two crossings over marshes—you can’t touch those wetlands here. But good players have a wide-open fairway and the green should be reachable in two. There’s no water around the green, nothing but sand.
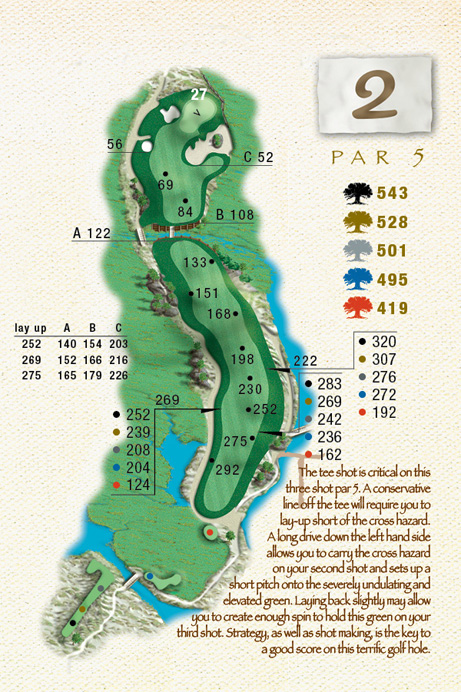
A good risk/reward hole, so bite off as much as you dare on your drive. Hitting it right sets up a lay-up short of the waste area, bisecting the second shot’s landing area and a 5- to 9-iron to the green. Bite off more on the drive and you can clear the waste area and have a pitching or sand wedge to the green. Much depends on the wind, though. The hardest part of No. 2 is the third shot. The green is very narrow and long. If you don’t hit a really good third shot, you’re looking at bogie or worse.
- Yardage:
390
Handicap: 9 - Yardage:
367
Handicap: 9 - Yardage:
319
Handicap: 9 - Yardage:
310
Handicap: 9 - Yardage:
268
Handicap: 11
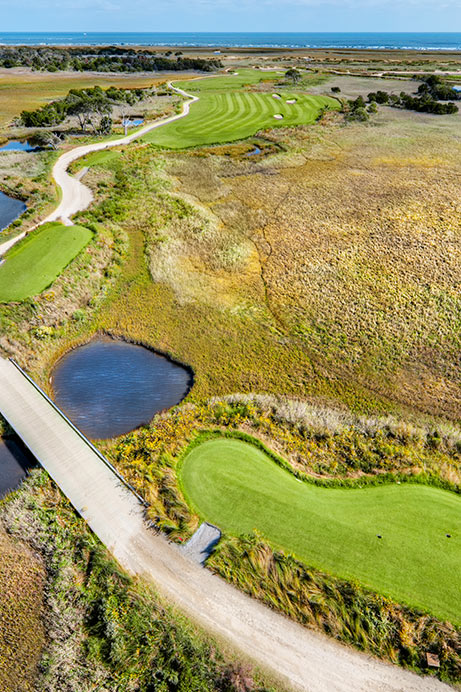
From an island-like tee, you’ll fire across the marsh to an extremely wide fairway. The best drives will find the plateau on the left side of the fairway where you can get the best look at the putting surface. Even a half wedge can be treacherous. Players missing this green will face a very difficult up and down.
Pete Dye’s Comment: This is one of the most unusual holes on the course with the green on flattened sand dune next to the marsh. Better players will go at this elevated, tabletop green with a 9-iron or pitching wedge. Let it fly off the tee—this is probably one of the widest fairways on the course.
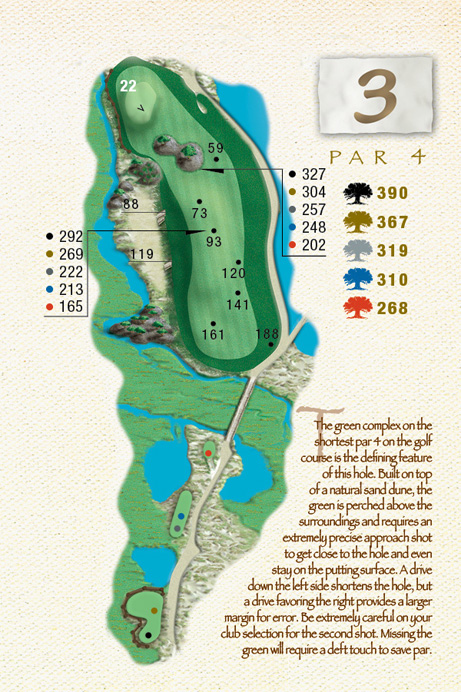
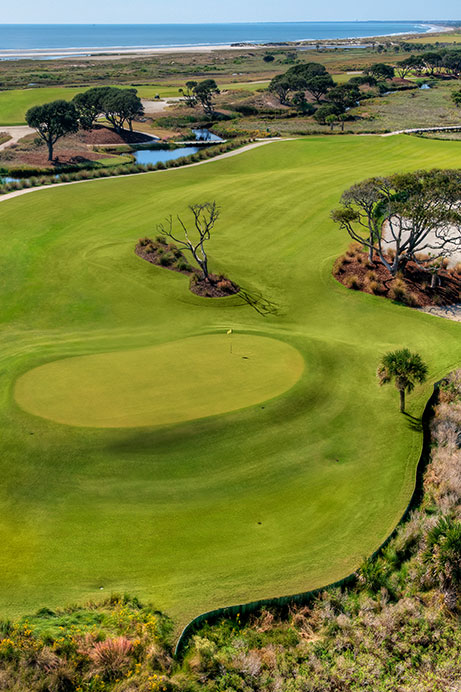
Positioning your drive on this hole is very important. You want to be on the upper tier on the left, leaving you almost level with the green. Drive it to the right and you will be faced with a shot to an elevated green. Taking wind into consideration, a player’s concern for the second shot is “don’t be left” as the marsh is there to catch the shot. Shots long, short or right of this tabletop green tend to make for a very difficult up-and-down. If you miss the green and are chipping back into the wind, you stand a better chance. If you miss the green and are chipping with the wind, that means trouble.
- Yardage:
453
Handicap: 1 - Yardage:
432
Handicap: 1 - Yardage:
401
Handicap: 1 - Yardage:
396
Handicap: 1 - Yardage:
328
Handicap: 3
The most difficult hole on the outward nine, the second shot to a large green can be played with nearly every club in the bag, from an 8-iron up. Playing against the wind, you may opt to bail out to the left of this green and try to save par with a chip or even a putt from the extended collar area.
Pete Dye’s Comment: As one of the longer 4s from the back tees—players will have to let it fly. It’s strictly a driving hole. There is a bailout area in the front left of the green. If the pin is on the left side of the green, you can bounce it on.
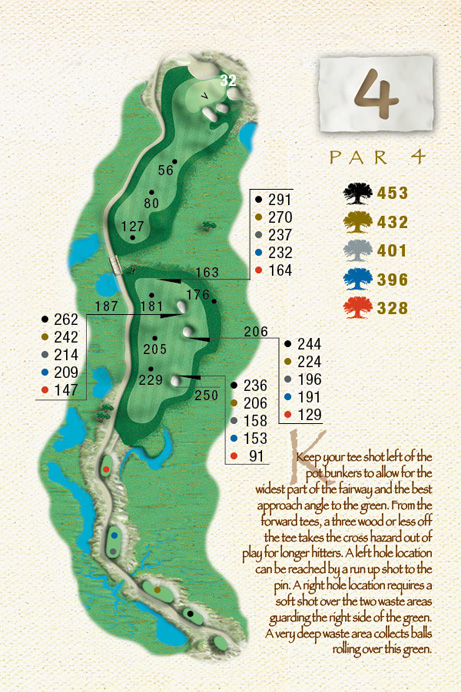
This hole is just hard. It requires a good drive for a chance to reach the green in two. However, long-hitters should beware of driving through the fairway, especially downwind. There’s more room on the right than appears from the tee. The best angle into the green, however, is from the left side of the fairway. Then, expect to hit a mid- to long-iron, depending on the wind, into the green.
- Yardage:
207
Handicap: 11 - Yardage:
185
Handicap: 11 - Yardage:
177
Handicap: 11 - Yardage:
171
Handicap: 11 - Yardage:
117
Handicap: 5
You’ll survey an hourglass green running away diagonally from the right. A large natural sand area runs from the tee to green ending in a steep face that cuts into the middle. You must hit the appropriate portion of this largest green on the golf course or face a very difficult two putt.
Pete Dye’s Comment: The majority of time, the wind is off your left shoulder. The better player will go at it with a 3- or 4-iron. There’s a bailout area on the right for non-pro players that should have you coming out with par, but watch for the sand on the front-left side of the green.
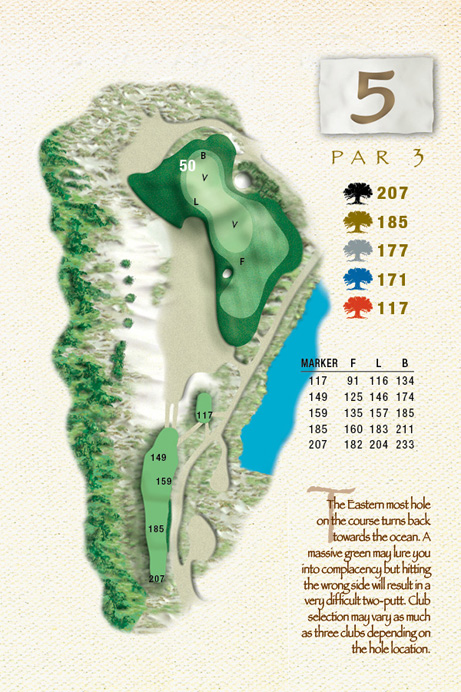
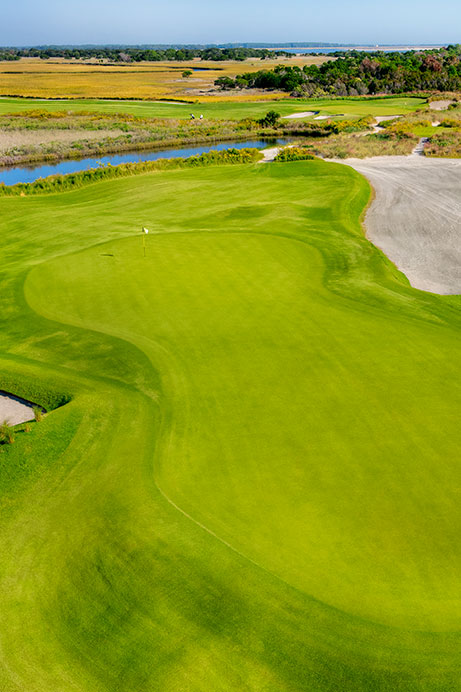
A great strategic hole. Plenty of room to bail out on the right. It’s a gigantic green, running away from left to right, but it can tease you with a pin on the left. There can be as much as a 3- to 4-club difference, depending upon pin location.
- Yardage:
455
Handicap: 13 - Yardage:
377
Handicap: 13 - Yardage:
345
Handicap: 13 - Yardage:
331
Handicap: 13 - Yardage:
299
Handicap: 13
The perfect drive is one directly at the center oak with a slight draw, eliminating trouble from a natural sand area and pond to the left. The green is open in front, but protected left and right by more sand. Expect to see many approach shots finding the center portion of this narrow, deep green.
Pete Dye’s Comment: This plays best right to left off the tee, with wind off your left shoulder. The landing area is not very generous, but there is nothing in front so you can roll a ball onto it. The bunker on the left (two-thirds of the way back) shouldn’t be a problem if you drive in the fairway.
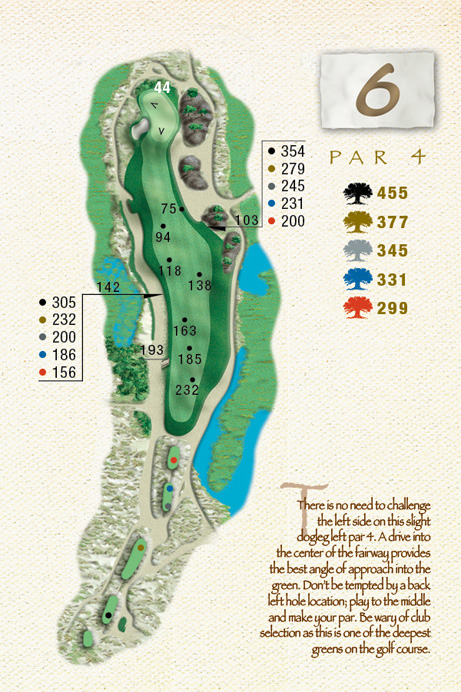
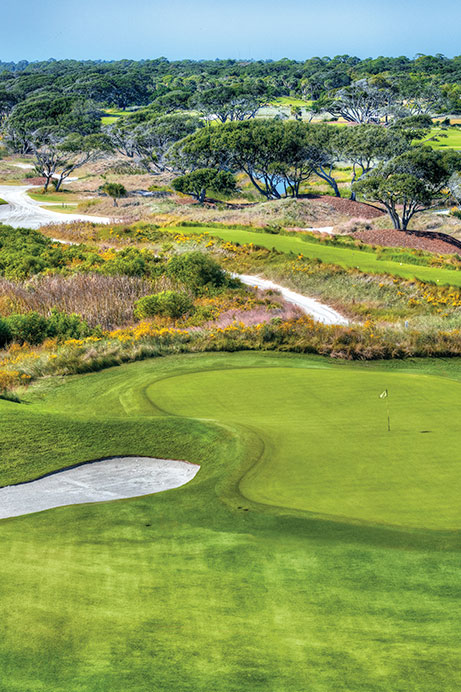
While most of the holes place a premium on driving, the hardest part of this hole is the second shot. Players must be on the right part of the green to score well here. It’s a very deep green with a lot of undulation.
- Yardage:
527
Handicap: 7 - Yardage:
505
Handicap: 7 - Yardage:
493
Handicap: 7 - Yardage:
484
Handicap: 7 - Yardage:
432
Handicap: 5
Here, wind conditions will determine the strategy for the tee shot as you must decide whether to carry a natural dune area that intrudes into the fairway from the right or play left of it. Once that decision is made, the second shot can be fired at a slightly elevated green that is open in the front.
Pete Dye’s Comment: This fairway is monumentally wide, and bunkering and grass mounding around the green is not severe. Pros go for this green in two, but the green itself is a challenge with a good amount of contour major dip in it.
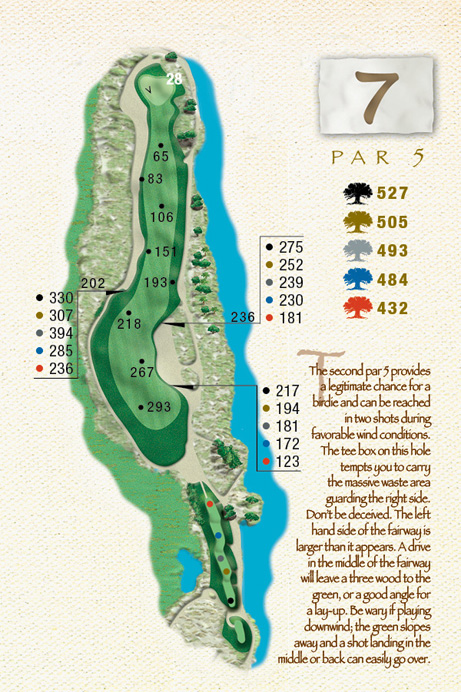
This hole can either be one of the hardest on the course or one of the easiest depending on the direction of the wind. Into the wind, if you hit a driver off the tee, the bunker on the right comes into play and forces you to lay-up and hit a wedge into the green. This risk/reward hole is one of the best chances to birdie on the front side. There is a tree and water on the right side of the green and a waste bunker running down the left side of the fairway and around the back of the green.
- Yardage:
197
Handicap: 17 - Yardage:
170
Handicap: 17 - Yardage:
166
Handicap: 17 - Yardage:
151
Handicap: 17 - Yardage:
105
Handicap: 17
This seemingly simple hole will become more difficult the further the pin is cut into its elevated green. Framed by tall live oaks just off its front left corner, it becomes narrower as it extends away from the tee. Any missing long or right shots will find the sand.
Pete Dye’s Comment: The only key here is the front part of the approach to the green is short grass. Into the wind, it’ll be an easy hole, but downwind it could be a nightmare with players having to hit it short hoping it bounces up there. The water behind the green shouldn’t come into play.
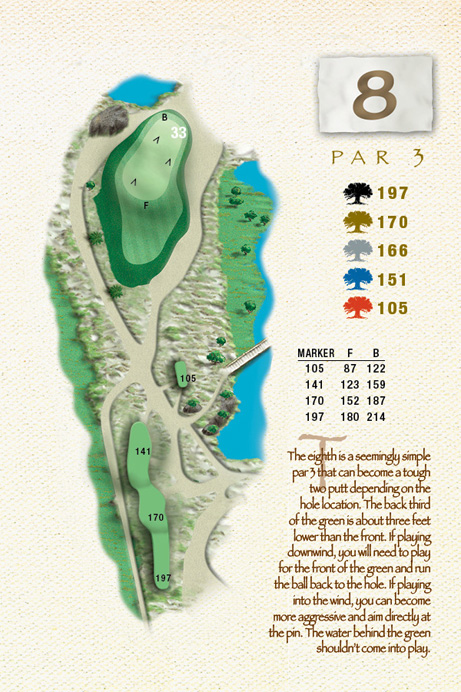

No. 8 is a tough risk/reward hole, depending on the pin position. The back right of the green is definitely a “Sunday placement.” If the pin is back, you’re looking at up to two extra clubs. The back third of the green is about three feet lower than the front two-thirds which means a very testy little putt if you have to negotiate the hill. But, this is a hole where you can’t be long. It’s a teaser hole where players generally play to the left side of the green.
- Yardage:
464
Handicap: 5 - Yardage:
415
Handicap: 5 - Yardage:
406
Handicap: 5 - Yardage:
399
Handicap: 5 - Yardage:
344
Handicap: 5
A wide fairway sloping down from the right makes driving length more important than direction. The putting surface is open in the front but presents plenty of tough up-and-down chances from an assortment of grassy swale and deep sand areas both left and right.
Pete Dye’s Comment: The big deal on this hole is that the green is a little bit offset, so the ball has to be turning right to left on the second shot or you’ll have to carry it to the green. Downwind it’ll be a driver, 7-iron, but into the wind it could be a driver, long iron.
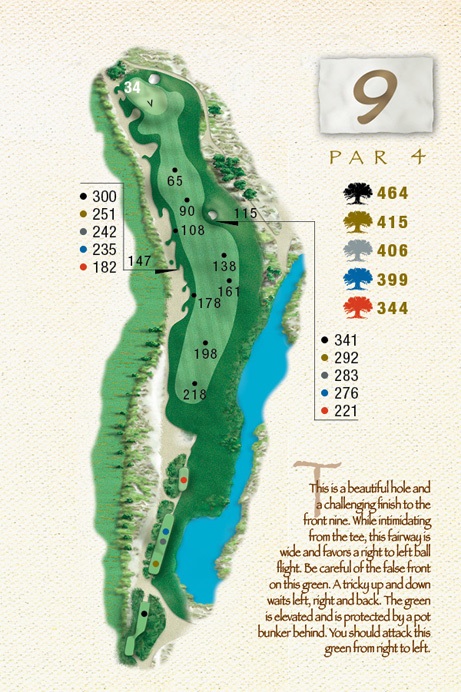
It’s a hard hole no matter how you slice it. Drive position is key. The fairway is wide, but drops off the end of the earth on the right. You’ll want to keep your drive down the left side, flirting with the bunkers and leaving yourself the best shot at the green. Drive it to the right and you have a hard time getting home in two. Assuming you hit a good drive, you need to miss the green short because a tricky up-and-down awaits left, right and back.
- Yardage:
439
Handicap: 18 - Yardage:
378
Handicap: 18 - Yardage:
360
Handicap: 18 - Yardage:
347
Handicap: 18 - Yardage:
310
Handicap: 12
A drive down the left-center to the crest of the fairway will set up a second shot to a green set down into the dunes. Players are faced with a large sand area to the left front of the green and a deeper, steep faced sand area to the back.
Pete Dye’s Comment: This tee is elevated atop a sand dune for a panorama of the back nine. The driving area is very liberal with the fairway rolling right into the ground-level green. Pro players can hit driver and short irons to birdie it. It’s very comparable, but in the reverse direction, to No. 1.

This is a big risk/reward hole aiming over the waste bunker off the tee. If you miss, you’re staring at the bunker’s huge wall forcing you to lay up. If you can get it over, it’s just a short wedge down the length of the green. While laying a drive out to the left may seem like the smart play, it means hitting over a waste area to a slim slice of green.
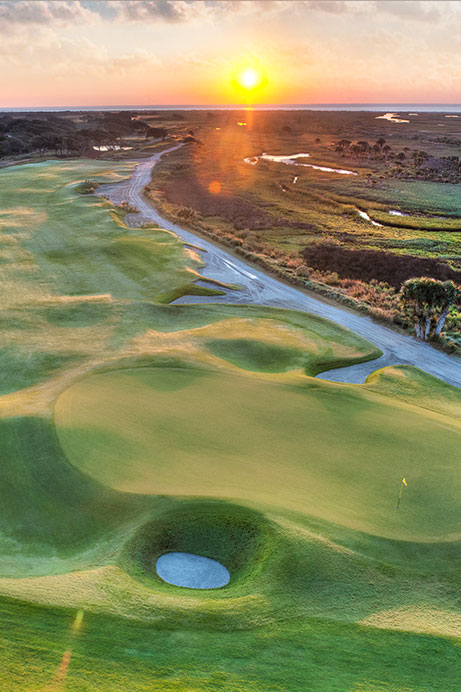
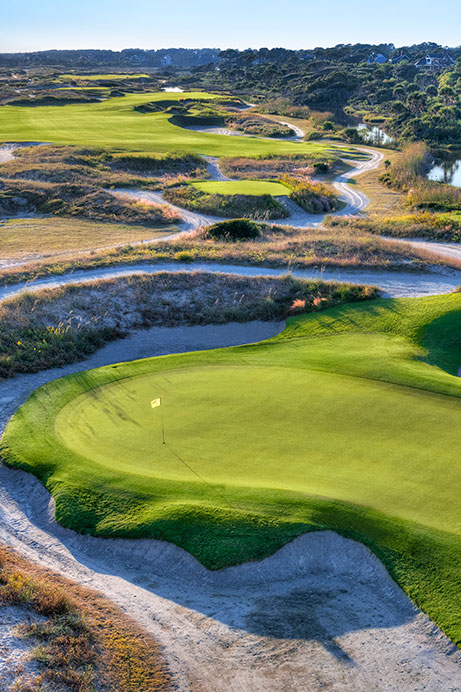
- Yardage:
562
Handicap: 10 - Yardage:
521
Handicap: 10 - Yardage:
506
Handicap: 10 - Yardage:
476
Handicap: 10 - Yardage:
440
Handicap: 4
The key to this hole is an accurate lay-up. Off the tee, you must avoid sand areas right of the fairway. For the second shot, it’s better to lay back on the right side, taking the sand area left out of play. A good lay-up will leave a pitch to a putting surface set atop a dune ridge.
Pete Dye’s Comment: Players must hit the fairway, but there’s no reason not to. The second shot must be placed in a very narrow area to get into position to pitch to the green. Holding this elevated green should be easy, except from the right-hand side of the fairway.
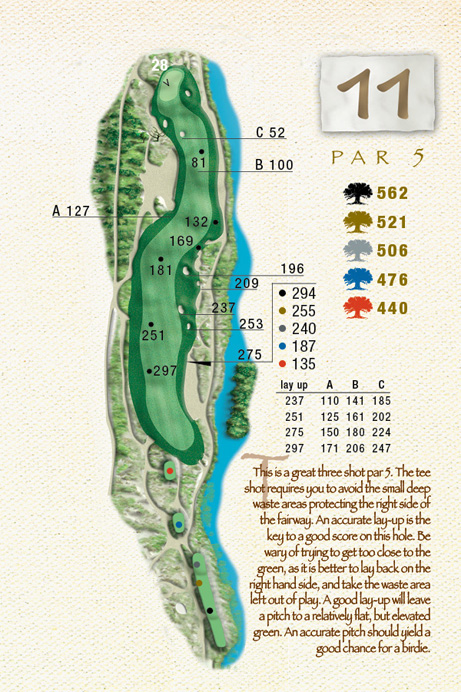
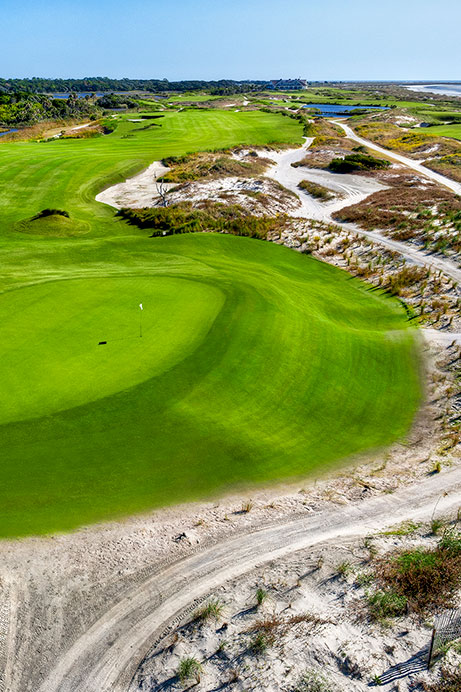
This par-5 tempts the pro player to go for the green in two. Luckily, reclaiming some of the original bunker lines gives the average player a better chance at recovery if their ball slices into that area.
This is the hole that caused Annika Sörenstam’s loss in the Shell Wonderful World of Golf matches in 1998.
- Yardage:
466
Handicap: 8 - Yardage:
420
Handicap: 8 - Yardage:
412
Handicap: 8 - Yardage:
398
Handicap: 8 - Yardage:
326
Handicap: 6
This hole boasts the widest fairway on the course, which gives way to one of the narrowest approaches. A good drive sets up a downhill second to the green. Though narrow, the approach is open in the front, with a rolling collar area providing the players some room to miss left.
Pete Dye’s Comment: Miss your tee shot right or left and it’s disaster. You don’t realize how much of an opening there is going into the green—but it appears to be very narrow from your second shot area. Of course, undulations in front of the green make a bump and run tricky.
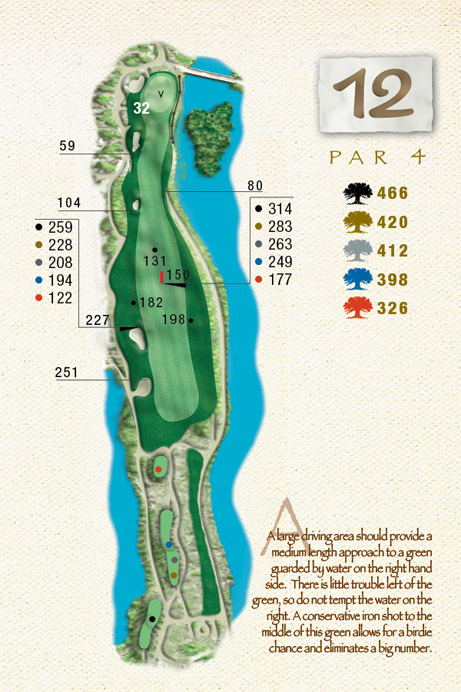
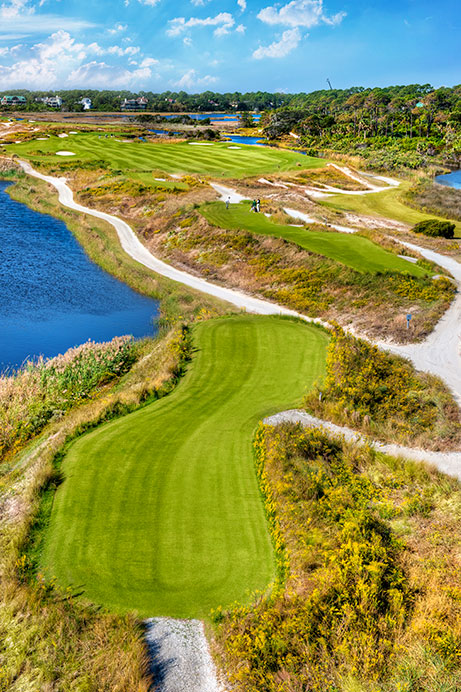
The strongest part of this hole is on the approach shot. The approach is severely downhill. There’s a big undulation on the left center of the green, making it a tough up-and-down. Again, finesse on your second shot is key.
- Yardage:
404
Handicap: 12 - Yardage:
371
Handicap: 12 - Yardage:
364
Handicap: 12 - Yardage:
333
Handicap: 12 - Yardage:
312
Handicap: 10
This may be the most difficult hole on the inward nine. The canal running down the entire right side will certainly come into play on tee shots. You must decide just how far down the canal you’ll try to carry, setting up a demanding approach.
Pete Dye’s Comment: There are definitely two different holes here. One hole is way back, 470 yards, and the landing area is very wide, about 180 feet. But I built another tee, 400 yards or so, with a very narrow landing area. It’s a good hole from either tee.
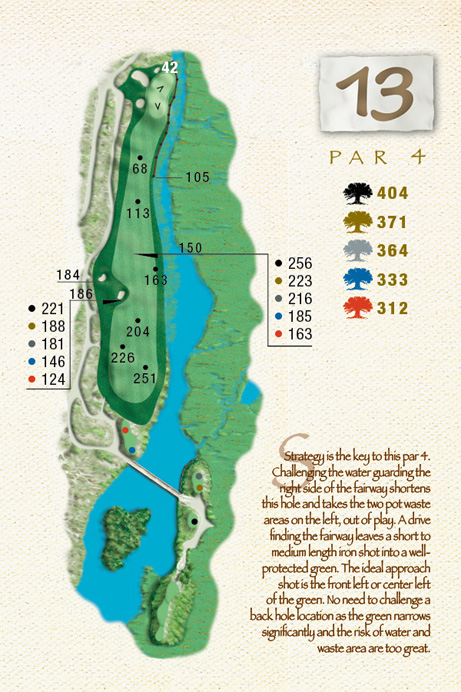
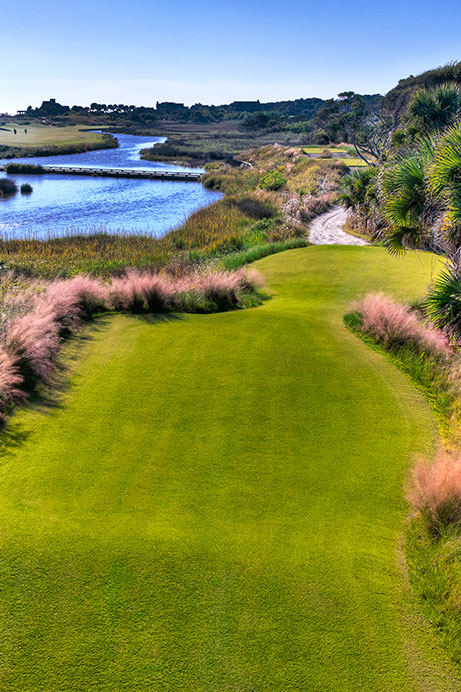
Another risk/reward drive. There are two fairway pot bunkers that come into play. The green, with water on the right and bunkers on the left, is long and narrow where pin placement can make club selection problematic. From the whites it’s a very short hole, but has a very narrow landing area.
- Yardage:
194
Handicap: 14 - Yardage:
171
Handicap: 14 - Yardage:
161
Handicap: 14 - Yardage:
151
Handicap: 14 - Yardage:
132
Handicap: 16
This is perhaps the most beautiful hole on The Ocean Course, but also one of the most treacherous. A tee shot missing this severely exposed and elevated green will leave a severe uphill chip or pitch to save par, and the putting surface is the most exposed on the entire course.
Pete Dye’s Comment: This hole—after the flat greens at 12 and 13 and the change in wind since the course is going back eastward now—will make players think. They’ll likely need between a 2- and 4-iron to hit the green.
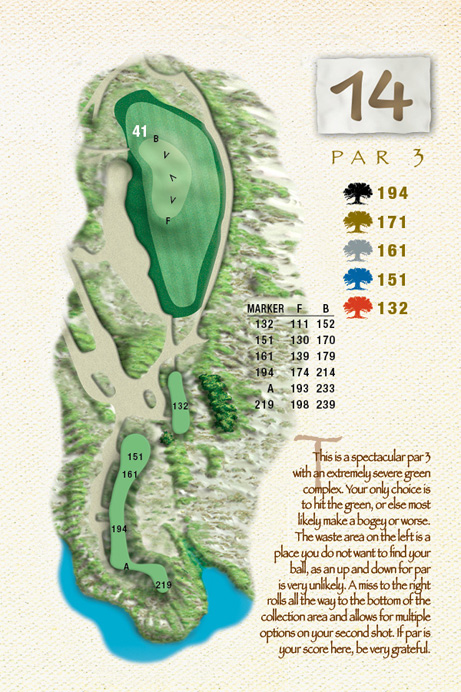
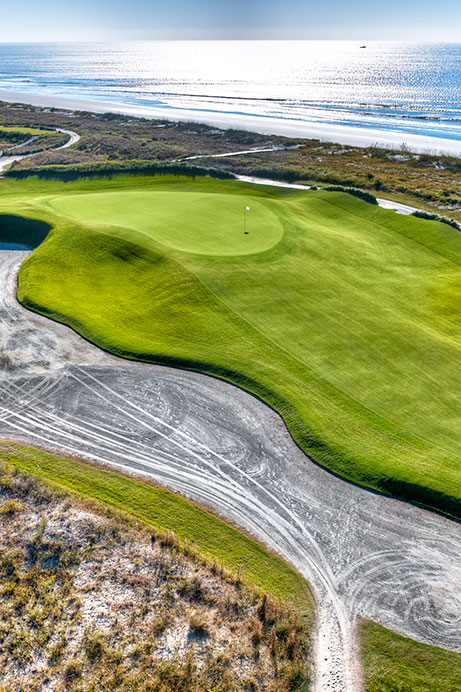
The tee at No. 14 is one of the most dynamic ocean views on the course. It’s also one of the most nerve-wracking views to an elevated, tabletop green with trouble nearly everywhere. The only place you can miss it front right. Miss it anywhere else and you’ll have a hard time recovering. There’s quite a bit of room behind this green but it’s a tough up-and-down.
- Yardage:
421
Handicap: 16 - Yardage:
391
Handicap: 16 - Yardage:
381
Handicap: 16 - Yardage:
358
Handicap: 16 - Yardage:
306
Handicap: 14
This seemingly straightforward hole often gets overlooked, much to the player’s peril. The tee shot must find the fairway to set up a mid-iron into the green set down into a natural dune area, making it difficult to determine wind speed and direction.
Pete Dye’s Comment: There are two championship tees here as well—just like 13 only in reverse. There’s a big landing area from way back and the green is the same elevation as the fairway, and you can bounce it in from right to left. It’s a small green, but very receptive on the right-hand side. Another tee at 395 yards gives you a very narrow driving area. It can play long or short like 13, but it’ll be with an iron if the tee is up.
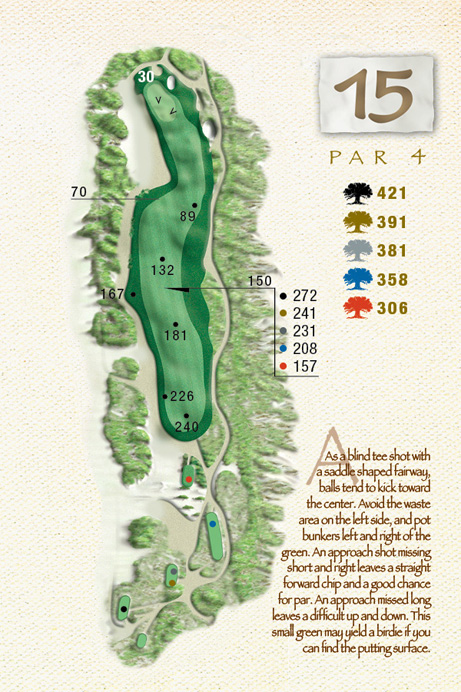
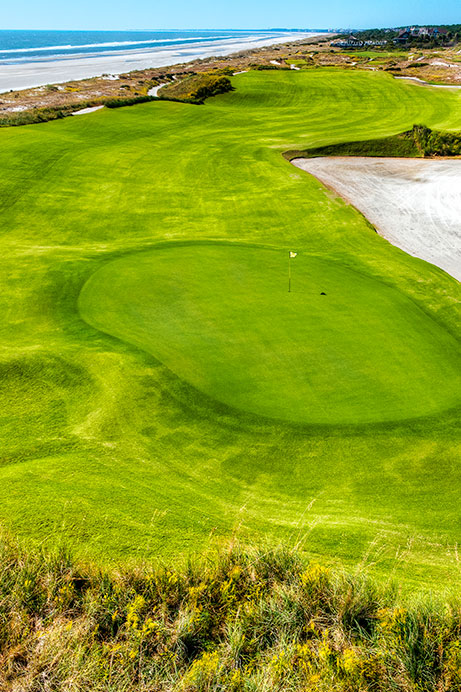
This is just a good, solid, straight up golf hole. A big landing area on a fairly short, incredibly aesthetic par-4. From the white tees, players are standing right next to the ocean. A collection area behind the green allows players a recovery for long shots.
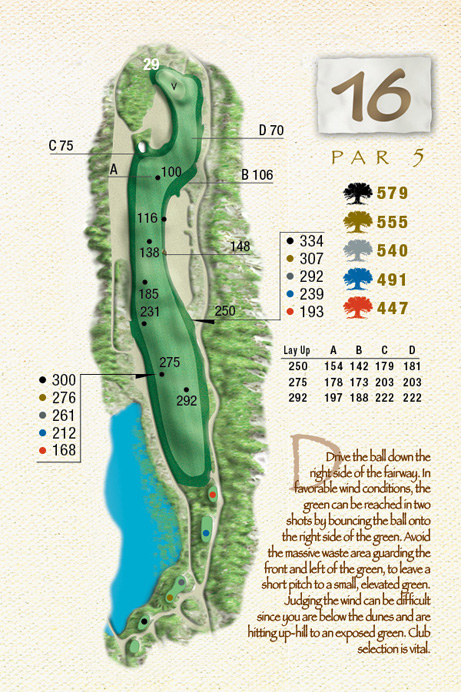
- Yardage:
579
Handicap: 4 - Yardage:
555
Handicap: 4 - Yardage:
540
Handicap: 4 - Yardage:
491
Handicap: 4 - Yardage:
447
Handicap: 2
Downwind, this hole will provide a great chance for birdie or eagle, with many players going for the green in two. Those that successfully navigate the extremely deep and dangerous sand area guarding the left side of this green will set themselves up for a late charge.
Pete Dye’s Comment: The advantage is to play down the right side and have a panorama of the second shot. Downwind, better players can reach it in two. There’s a big opening on the right side with a grass swale in front of the green. This is the best approach.
A good risk/reward from the forward tees where players can reach the hole in two. From the back tees, it’s a three shot par-5 unless it’s playing with a strong tailwind. The second shot landing area narrows down quite a bit. The toughest part of this hole is your third shot. It’s a very intimidating shot, where having the correct yardage is essential. Into the wind, don’t be surprised with a long iron third shot.
- Yardage:
221
Handicap: 6 - Yardage:
197
Handicap: 6 - Yardage:
182
Handicap: 6 - Yardage:
168
Handicap: 6 - Yardage:
122
Handicap: 18
On No. 17, the target appears narrow and is fiercely guarded by water short and to the right, with two deep sand areas to the left. Golfers that play this hole even par will certainly be rewarded.
Pete Dye’s Comment: The tee shot is all carry over water, a very demanding par 3 and my favorite here. There are sea oats and big dunes behind the green, which is almost a double green with a front and back landing area. There’s a small bailout area to the left of the green with water right up to the front. The green will call for a variety of shots, depending upon the pin positions and wind.
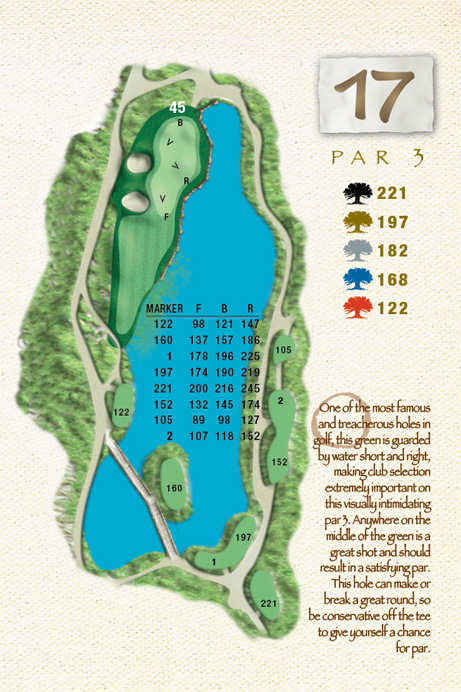

There are tons of teeing options on both sides of the pond. Wind plays a big part in the strategy for playing the hole. Any dry shot is a good shot on this hole.
- Yardage:
439
Handicap: 2 - Yardage:
421
Handicap: 2 - Yardage:
396
Handicap: 2 - Yardage:
386
Handicap: 2 - Yardage:
314
Handicap: 8
The best drives on No. 18 will hug the right side of the fairway. The wind determines whether players fire at the flag with mid irons or simply try to hit the green with long irons or fairway metals.
Pete Dye’s Comment: This hole must be played left to right because the dunes on the right are much more severe than any other hole on the course. I think it’s the best of the par 4s on the course.

A great finishing hole. There’s a premium on the drive and second shot. The drive over the waste area is intimidating for the average player. Players are looking down at the hole for their second shot with a panoramic view of the ocean and the dunes in the background. Players driving over the crest will see their ball run down the fairway to a point where mounds were created to stop their balls before they reach the rough. Into the wind, look for even the best players to pull out a long iron or more to reach this treacherous green.


